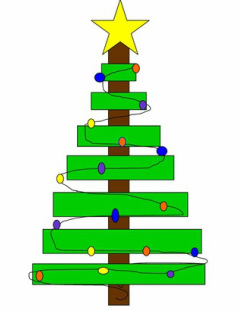
With a little time and effort you can create a rustic homemade Christmas tree that you can use for years to come. Great project for a small area or to just try something fun and new!
DIY Christmas Tree
Materials needed:
2-8’ boards (1 x 6)
1-10’ board (1 x 6)
Green spray paint.
Brown spray paint (if desired).
Saw
Sandpaper to soften cut edges
Screws (1”)
Screwdriver
String of lights
Star for top (purchased or created)
Hanger for tree (can be purchased at Square Deal)
STEP 1: Make sure you have the space to hang your tree on a wall (approximately 4’ wide at base, approx 7’ high).
STEP 2: Visit SQUARE DEAL and purchase your lumber. You can get all the lumber you need from an 8’ board and a 10’ board for the horizontal slats. For the vertical “trunk” of the tree, an 8’ board will work and you can trim down to your desired height.
STEP 3: Cut your boards to desired length, tapering down in size.
1 board @ 48”
1 board @ 42”
1 board @ 36”
1 board @ 30”
1 board @ 24”
1 board @ 18”
1 board @ 12”
Using sandpaper, soften any rough edges. Don’t sand too much, this is a rustic tree!
STEP 4: Paint all horizontal boards (branches) green. Paint vertical board (trunk) brown, if desired. Let dry.
STEP 5: Lay the “trunk” on a flat surface. Measuring from the top, mark at 4”, 14”, 24”, 34”, 44”, 54”, and 64”. These marks will be where you line up your “branches".
STEP 6: Place your 12” board under the 4” mark, screw in place*
Place your 18” board under the 14” mark, screw in place*
Place your 24” board under the 24” mark, screw in place*
Place your 30” board under the 34” mark, screw in place*
Place your 36” board under the 44” mark, screw in place*
Place your 42” board under the 54” mark, screw in place*
Place your 48” board under the 64” mark, screw in place*
(These do no need to be perfectly centered, but if you want them centered, measure to the center of each board and mark. Use that mark as a guide to center the boards on the "trunk".)
*You may want to pre-drill the holes to prevent splitting. Use 2 screws per board.*
STEP 7: Carefully flip your tree over and attach the picture hanging apparatus to the top of the trunk.
STEP 8: Hang your tree on the wall.
STEP 9: Arrange a string of lights around your tree branches.
STEP 10: Attach your star to the top.
Enjoy your new tree!
 RSS Feed