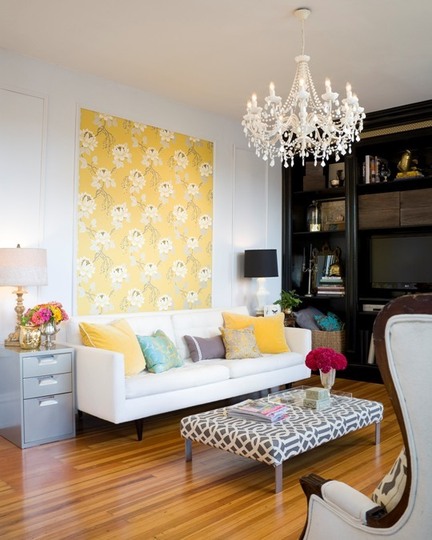
Wallpaper Moulding Frame
Baseboard moulding can be made into a decorative frame for any wall in your house. You can either cut the corners at 45 degree angles, or use a corner block or other decorative square for the corners. Using a block in the corners eliminates the need for angle cuts on the trim. There are multiple ways to use the frame once you have completed it.
Supplies:
Stud finder
Tape measure
Pencil
Trim Pieces
Corner blocks, if desired
Level
Saw (circular/miter, etc.)
Nails
Nail Gun
Construction Adhesive
Wallpaper or paint for interior of frame
Instructions:
1. Determine where on the wall to place or mount the trim frame. A frame can be built under or over a chair rail. You can also put a frame on a bare spot on a wall or over a fireplace.
2. Decide how large you want the frame to be. You could measure the wall first and determine the size that way, or just pick a size and go for it! (Make sure the frame size is smaller than the wall size.)
3. Using the stud finder, find the location of the studs in the wall and mark with a pencil. If using nails, you will need to plan carefully to attach your blocks and trim to the studs. If you use adhesive, stud location is not as important.
4. Measure the width of the corner block with the tape measure. The width of the block may vary, but a typical size is 2 inches.
5. Measure and mark trim pieces for the frame with the tape measure and pencil. Example: A 2 foot wide by 3 foot high frame will require 4 pieces of trim. The 2 pieces used for the width will need to be 20" long and the 2 pieces for the height will need to be 32" long (remember-the corner blocks are about 2")
6. Cut the trim to the length needed with a circular or miter saw.
7. Set one of the corner blocks in place on the wall, level it, and secure it with a nail gun. If you do not want to use a nail gun, apply construction adhesive to the back of the block and adhere to the wall.
8. Place one of the width trim pieces flush to the corner block. Secure the trim to the wall using the nail gun or construction adhesive.
9. Set another corner block in place at the end of the trim. Add the next section of trim, measured for length, and secure it to the wall. Add the remaining corner blocks and trim pieces until you have completed the frame.
10. Cover the wall inside the frame with wallpaper (trimmed to size) or paint it a color that contrasts with your wall color to complete your project. You could placed framed pictures or other items inside of your moulding frame to create an unique wall piece.
Tips: Always wear protective eyewear when using power tools. Have rags handy to wipe up any spills.
Source reference: http://www.ehow.com_6719380_trim-wall-frame.html#ixzz32BKa17Yf
 RSS Feed